Have you noticed the days are getting shorter and the nights are cooler with the anticipation of seeing beautiful fall leaves? Can’t wait for the fall leaves? Neither can we!

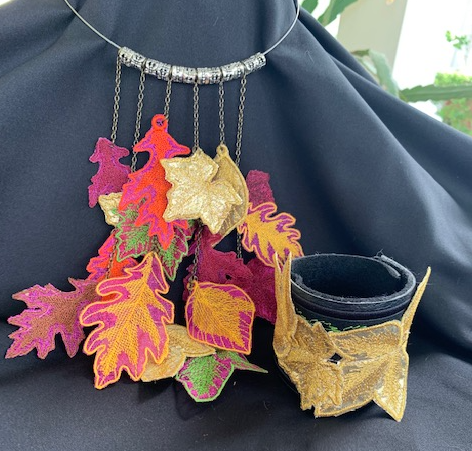
We’ve got a “twofer” for you today; some gorgeous autumn leaves you can make in a free-standing lace style and use as stylish jewelry.
Today we have a project that uses very simple materials to make a dangling leaf necklace and an elegant cuff bracelet adorned with the best autumn colors.
Why Create These Easy Colorful Autumn Leaves
With holidays of every kind coming up, we often turn our thoughts to gifts we can buy for people we care about. The holidays, however, have become an Olympic sport of buying, wrapping, and hiding gifts; seeing who can get the best deals on the most “stuff.”
Holidays are traditionally a crafter’s paradise, so why not combine amazing gifts with your artistic skill and make really meaningful gifts for those on your list?
The beauty of these two projects is that you don’t need expensive materials; in fact, you might find some materials you would normally discard, but they can be repurposed. Once you get the hang of this technique, you will have endless possibilities. So if you are ready to dive into autumn projects, so are we!!

These leaves can be easily created and stitched out with several designs in the hoop to save fabric, stabilizer, money, and time, so make sure when you set up your leaves that you fill your hoop and get the most out of your space.
Supplies Needed For These Easy Embroidered DIY Autumn Leaf Necklace and Cuff
- Organza fabric
- Water Soluble stabilizer
- Polyester embroidery thread
- Gold metallic thread
- Craft felt
- Crafting chain of your choice
- Pre-made neck wire necklace (usually comes in a 3-pack)
- Jump rings
- Pliers
- KAM or other plastic snaps with a long shank
- 3D leaf embroidery designs
Check out our 100+ different 3D nature-related embroidery designs (including various gorgeous 3D leaf designs) to perfectly accentuate your next autumn project.
We used some organza left over from Valentine’s Day in this project! It came wrapped around a pot but looked too good to toss out. We used a bright fuchsia color which you might think is a crazy choice, but have you looked at autumn leaves? They are FULL of color! Pinks, yellows, green, purple, red, and brown in every combination.
Remember that when you put these all together, the crazy green outline over pink, or the brown over pink, will all be part of a colorful necklace.
We pulled out some shiny gold woven material for the gold cuff bracelet. When stitched out with gold metallic thread, these leaves are lush and rich and can be used on more than today’s project. Truly almost any fabric could be used on this free-standing lace so never say never when looking at potential materials.
Colorful Autumn Leaves Free Standing Lace Jewelry Tutorial
We’ll start with how to set up your project. We are using Wilcom Hatch 3 as our embroidery software, but you may use the software that works best for you.
Interested in a free 30-day Hatch trial where you “use it like you own it”? You can use all Hatch Software features to create your own designs & see how user-friendly it is.

In this project, we used several 3D embroidery leaves, which we resized slightly for the necklace. The leaves come in 2 sizes, large and small; you can use one large leaf as a statement piece or as many smaller leaves of varying sizes to create your jewelry masterpiece.
How To Digitize 3D Leaves For Your Jewelry Project
1) Choose and download your 3D Autumn Leaf design
2) Insert the design into your embroidery software.
3) Resize the design.
On this particular design, you may resize up to 25% but no smaller as it can affect the satin lines. In general, do not resize designs more than 10% for best results
4) Digitize a small satin stitch loop and place it on the leaf in the best placement for hanging the leaf.
5) Fill your hoop with leaves to make the best use of your materials but leave at least ½ an inch in between the leaves, so you have room to cut them out.

6) Make sure to order the stitch sequence out so all the green, red, etc., are grouped- this will save time during your stitch out.
That is it! These are “Plug and Play” designs that can be used over and over again!
Once you have your design set up (save it for later with your designs), you are ready to hoop the fabric for your leaves. We have decided to use some leftover pink organza material that covered an orchid pot on Valentine’s Day.
How To Hoop & Embroider Your 3D Leaves
7) Lay your hoop base on a stable surface.
8) Lay a piece of organza on the hoop.
9) Lay a piece of water-soluble stabilizer over your first layer of organza.
10) Lay the second piece of organza on top of the stabilizer to create a fabric “sandwich.”
11) Apply the top hoop and place it in the machine (try not to over-stretch the material).
12) Stitch your design.
13) When completed, remove the fabric from the hoop and hold it under warm running water to dissolve the stabilizer.
Do not wash out all the stabilizer as you need the stiffening effect to make lovely, crisp leaves.
14) When they’re dry, carefully cut out your leaves as close as possible to the leaf edge but do not cut through the stitching.
Assembling Your 3D Embroidery Leaf Necklace
1) Measure 5 pieces of craft chain; 2 short, 2 medium, and 1 long. In this example, we used 3, 5, and 7-inch long pieces.

2) Attach your leaves using pliers and jump rings to the craft chain one every 1-2 inches. You can alter this to your taste.

3) When your chains are complete, attach them to the neck wire alternating with a bead. If they are too close, use two or more beads to space them out.
4) THAT’S IT!!! You’re ready to hit the town or be the best-dressed person at the office.
Gold 3D Embroidery Leaf Cuff Tutorial

Ready for some more amazing leaves? Try these liquid gold leaves sewn onto a quick vinyl or leather cuff!
How To Digitize 3D Leaves For Your Jewelry Project
Use the method above. We used gold woven costume fabric and gold metallic thread. The steps are the same but do remember to slow down your machine to the slowest speed for the best results.
Never worked with metallic thread? Check out the video below for a great trick that will show you how to avoid thread breaks and how to properly use metallic threads.
How To Embroider Your Cuff
- Digitize an outline rectangle 2 inches wide and 8 inches long. (Remember, you can do more than one at a time!) This will be your placement line (we make ours red to start).
- Copy that (or those) outline(s) and paste them in place. These second lines will become your outline.
- Change the second running stitch outline to a 4mm (0.15 in) satin line and change to the color of your choice
- Digitize a smaller running stitch outline inside your border and change it to a Leaf Motif found in the “Outdoors” section of the leaf motifs in the Wilcom Hatch 3 software. These motifs change a single line to wonderful pre-designed shapes and objects to really jazz up your design.
Your design sequence should look like this:

5. You’re ready to stitch!
To Stitch Out Your Embroidered Cuff
- Hoop a piece of medium-weight tear-away stabilizer.
- Cut a piece of vinyl that is 3×9 inches.
- Place in the machine and stitch out the placement line.
- Using temporary embroidery adhesive spray, tack the vinyl using the placement line as a guide.
- Return the hoop to the machine.
- Finish your stitching.

7. Remove from the machine.
8. Remove the excess tear-away stabilizer.
9. In a well-ventilated room away from your machine, spray the back of your vinyl cuff with permanent adhesive spray. Also, spray the piece of felt, which is 3×9 inches.
10. Allow them to become tacky and stick these together.
11. When dry, carefully trim to the edge of your satin border.
To place your liquid gold leaves on the vinyl or leather cuff
- Select 3-5 leaves
- Sew them down using gold (non-metallic) thread onto the vinyl cuff (we used black bobbin thread). You can attach these using a single stitch line; this way, they can bend and stand up, creating a lovely 3D look.

3. Add plastic or metal snaps in the four corners, and you are ready to go!
Conclusion: Fall Jewelry Is Easy & Budget-Friendly
Making jewelry is only one example of using these versatile and beautiful leaves. The limit is your own imagination.
The main takeaways we have for you when working on these delightful free-standing leaves are:
- Stop thinking two-dimensional! These leaves can be bent, curled, and displayed on more than a flat surface.
- Try some metallic. Many people are afraid to use metallic thread because it might break or won’t look good, but with some simple tricks, you can stitch some metallic beauty!
- Save your scraps! Sometimes the things we throw away are the best materials for a small project, and you don’t have to make an expensive trip to the fabric or craft store.
Always remember, we love seeing your stitch-outs and take on our projects! Please post them in our Digitizing Made Easy Facebook group and learn more about how to use the Hatch Embroidery Software and improve your digitizing skills in our Wilcom Hatch Embroidery Software Facts Facebook group.
P.S. Don’t forget to check out our other high-quality 3D embroidery designs to accentuate your next embroidery project perfectly!

Leave A Comment