Want to perfectly accent any outfit without the price tag? We’ve got a way to add some tasteful jewelry to your wardrobe while saving money (and nobody has to know)!

Follow our steps in this project tutorial to create your own stylish embroidered earrings.
Why Create These Free-Standing Embroidered Earrings?
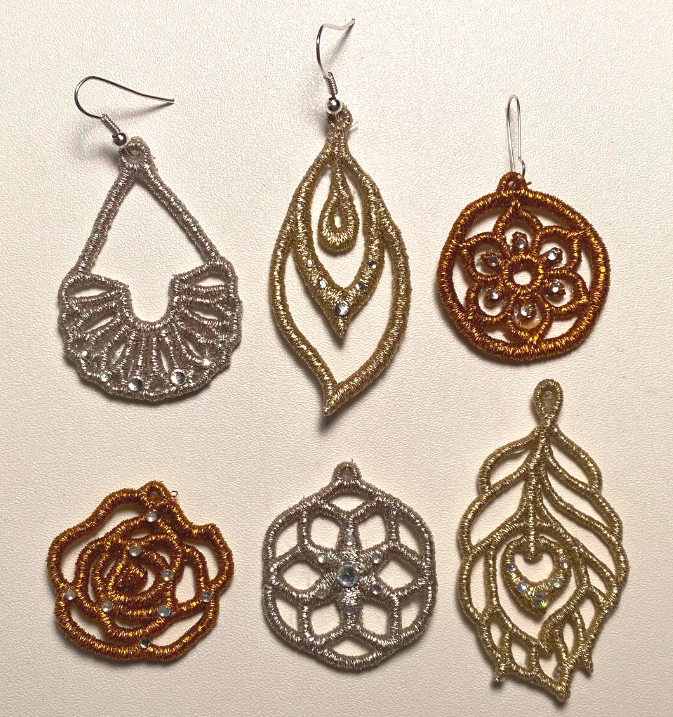
These easy free-standing embroidered earrings are perfect for putting together any outfit! Whether you want them to be subtle or add some bling, these earrings are chic, fast, easy to make, and ready to wear in no time.
These embroidered earrings can be customized for personal preference (or why not make a few with different looks)? Whether you want to differentiate them use metallic embroidery thread, the color of your embroidery thread, 3D puff stuff, diamonds, etc., your options are endless! You’ll have a new pair of earrings to perfectly put together each outfit.

These earrings make great gifts! Not only will they be one-of-a-kind, great quality, and stylish, but you can also tell your friends and family, yes, I made this!
Did we mention these earrings are budget-friendly? There aren’t many materials needed, and if you decide to use puff stuff, diamonds, and earring hooks, you can buy in bulk to save more money in the long run.
Supplies Required For These Free-Standing Embroidered Earrings:
- 2 pieces of wash-away stabilizer
- Painters tape
- Embroidery Scissors
- Metallic thread (or whatever thread you want your earrings to be)
Are you struggling with thread breaks when you use metallic threads? Click here to see how you can prevent metallic threads from breaking.
- Matching bobbin thread (NOTE we don’t recommend using metallic thread in bobbins)
- Earring hooks
- Earring pliers (long nose pliers can work too)
- Earring embroidery designs
Want to check out our other free-standing embroidery earring designs? Click here to check out different earrings designs.
Optional:
- Diamonds for extra sparkle
- Glue for diamonds or extra embellishments
- 3D Puff Stuff (for a stunning raised effect)
Check out our Puff Stuff! It adds an extra level of dimension; no foam, software, or design adjustments are required!
Free-Standing Embroidery Earrings Tutorial
More of a visual learner? We’ve got you covered. Watch our Youtube tutorial here.
Step 1:
Hoop 2 pieces of wash-away stabilizer and run the earring embroidery designs.

If you want to use Puff Stuff, lay a piece of Puff Stuff over the stabilizer and hold it in place using painter’s tape. Run the design as you would normally.

Step 2:
When the designs are finished running, remove them from the hoop and cut them apart individually.
Rinse out the wash-away stabilizer using warm water.

When using Puff Stuff, run the earrings under warm water and gently scrub them with a soft toothbrush to remove the Puff Stuff residue.

Step 3:
Using a pair of pliers, open the loop of your earring hook.

With that opening, put it through the top loop of your embroidered earring.

Close the earring loop tightly to ensure the embroidered earrings stay on the earring hook.

Step 4: (optional)
Add that extra “wow” to your earrings by adding some diamonds! Add to the earring as you see fit.

Finished:
You’re finished! Quick, easy, and ready to impress!

Conclusion: With the Right Embroidery Designs, Looking Stylish Doesn’t Have To Be Expensive!
While being budget-friendly, a great gift option, and having the ability to produce multiple looks, why wouldn’t you make these chic free-standing embroidered earrings? Whether you want to put together any outfit or stop focusing on others and create something specifically for yourself, this is the right project for you.
P.S. If you want to create different free-standing embroidered earrings, browse through our collection of machine-friendly earring embroidery designs. Plus, check out our Embroidery Legacy Design Club to learn how to save on our entire database of close to 30,000 quality designs.

Leave A Comment