There is nothing more elegant than a beautiful table with a wonderful meal and a crisp, embellished napkin on your lap. Did you know there is nothing easier than embroidering on a napkin?

Let’s talk about creating beautiful heirloom linens for your next event, grand or small!
Embroidery Placement On Napkins
Placement on a napkin is your choice.
Choose a design that can be placed in the corner.
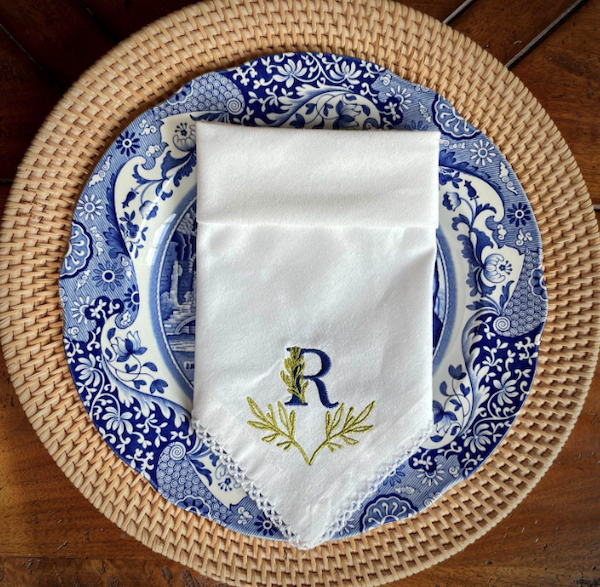
When folded, the stitching should be prominently displayed.
Whatever you choose, make sure you are not just thinking of the napkin as a flat item but imagine it when folded.
This will help you to decide how large to make your stitching.
Here are three possibilities for a corner:

A good rule of thumb is to create a design no larger than ¼ of the folded size. The design may appear small when the napkin is unfolded. Adhering to the 1/4 rule will ensure that the design is not too large design. You also want your guest to have a soft, smooth surface with which to wipe.

You can also embroider in the center or edge to fold your napkin differently.

Embroidery Designs For Napkins
After you know your napkin and placement, it’s time to choose a design that will look wonderful on your table. Most people will choose monograms or ciphers but remember that flowers, holiday décor, and more are fresh changes!
Some tips to keep in mind when choosing your design:
- Choose less stitch-intensive designs– designs with fewer stitches and trims, which create knots and bullet-proof embroidery.
- Choose a design with a satin stitch– the stitch should be less than 7 mm. This will reduce the risk of snags and pulls.
- Less is often more– when choosing, do not assume that simpler designs will not have a big impact.
When choosing a design, check out all our high-quality embroidery designs for soft, supple results.
Christmas Napkin Embroidery Designs

Check out all our Christmas embroidery designs for your next napkin project.
Update your Christmas table with customized napkins to spread Christmas cheer.
Monogrammed Cocktail Napkins

Another good option is machine embroidery fonts, and in particular, our selection of ESA (Embroidery Specific Alphabet) fonts.
These are versatile and resizable, perfect for your napkin project and more!
ESA fonts are exclusive to Hatch embroidery software. Try a free 30-day trial of Hatch Embroidery Software to use it like you own it. See for yourself how user-friendly it is.
ESA fonts are specifically digitized to create alphabets that work! You can learn more in our ESA Beginners Guide.
The lettering does not have to be a monogram: it can also be small sayings or single words. Your imagination only limits your choices.
Another option is our amazing collection of ESA Glyphs. Glyphs are little “pictures” which are re-sizeable and versatile!
These ESA Vintage Corners Glyphs would be perfect to embellish any napkin.

Monograms! These are the most popular and most common machine embroidery on napkins.
You can use single letters or a combination of letters to create an heirloom monogram. They are often elaborate and fancy, but more people are choosing more sleek and simple designs. If you’d like to learn more about monogramming, check out our Embroidery Monogramming Guide for Best Results article.
Machine Embroidery Napkin Corner Designs

Check out this elegant cutwork lace napkin embroidery design for your next napkin project.
Add an extra touch of elegance to your napkins to wow your family and friends.
Have you ever seen amazing Cutwork corners on fancy napkins? You may have thought it looks difficult.
Our step-by-step tutorials ensure you get the best-finished results and a striking embroidered cutwork napkin.
How to Hoop A Napkin
You may be perplexed about how to hoop napkins, but there are a couple of easy ways to secure your fabric.
Embroidery Stabilizer for Napkins
A cutaway or tearaway stabilizer can leave lumpy backing on the reverse side of your embroidery. We suggest using a washaway stabilizer instead.
Tip: trim away unneeded stabilizer and save for making stiffening spray!
Hooping Napkin Corners for Embroidery
To hoop the napkin’s corner, baste it to a wash-away stabilizer and then hoop it as shown below. This allows you to stitch closer to the edge or float napkins on a wash-away stabilizer.
Remember to secure the napkin so it does not move on the hoop when floating. Create a placement line, then a basting line.

Use pins or painter’s tape; spray embroidery spray works well also on your embroidery machine hoop!

To hoop the center of the napkin, measure from the sides to the middle. Mark a center line in both directions with a wash-away marker.
Conclusion: Embroider Your Own One-Of-A-Kind Napkins
Time to put this information to use! Start embroidering your decorative napkin, and be sure to share your results with us.
Until we stitch again, happy embroidering!
P.S. Don’t forget to check out our 30,000+ high-quality embroidery designs to accentuate your next napkin project perfectly. Or, if you’re new to Embroidery Legacy, download 11 free embroidery designs, including a gorgeous freestanding lace design, with our Free Embroidery Legacy Design Kit.

Leave A Comment