Let’s get into a prickly topic! Are you on pins and needles and need somewhere to put them?

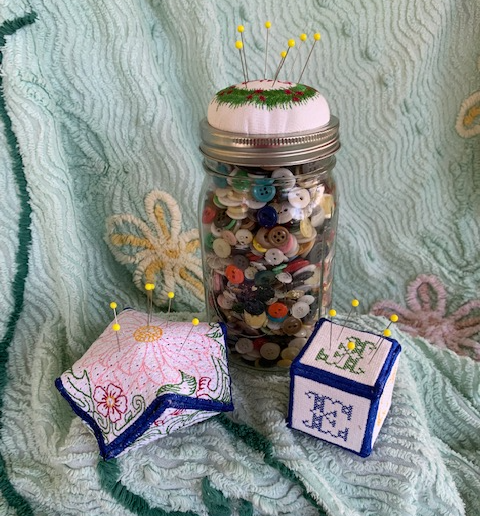
Today we’re going to go over some easy and creative ways how to make pin cushions. They’re simple and a great gift for beginner and experienced sewers that can be made with leftover fabric scraps.
Why Create This DIY Embroidered Pin Cushions
We all need fun and easy gifts, so why not think out of the ordinary gift box and make something fun and useful?
Of course, we all remember the tomato and strawberry pin cushions. They were always tucked in the corner of mom’s sewing box or on a relative’s sewing machine. They are useful and necessary to keep sharp pins and needles off the floor and out of our feet! But how to make them?
They are super fun and can be made in a hoop and sewn together. As wonderful gifts, these little delights can use up scrap materials, be personalized in any shape and size, and are quick and easy.
Supplies Needed For DIY Embroidered Pin Cushions
- Scrap fabric (at least 6 inches square)
- Tear away stabilizer
- Polyester stuffing
- Hand sewing needle
- Embroidery thread of your choice
- Jar with 2-piece lid
- Hot glue
- Embroidery designs or embroidery fonts
Want to check out embroidery designs for this project? Access almost 30,000 high-quality embroidery designs to embellish your pin cushion perfectly!
How to Make a Pin Cushion with Machine Embroidery:
Below are two different pin cushion options. They all have the same basic steps, but each has a little twist! Here are the basic steps in making your pin cushion:
- In your embroidery software, insert a design of your choice
- Create a border if needed
- Stitch your pin cushion
- Trim away fabric or use an applique method and water-soluble stabilizer
- Hand sew or hot glue your pin cushion and stuff
Bouncing Baby Block Pin Cushion
This super simple baby block pin cushion also makes a great toy! You will create a square, duplicate it, and then add letters, numbers, or whatever you want to personalize. Since this has so many parts, this one is stitched on backing and fabric with a satin edge, making it more stable (with less sewing!).

To digitize:
- Create a 2-inch square with a running stitch
- Duplicate the square and arrange it in a “t” pattern as you see in the diagram
- Duplicate all objects and paste them in place.
- Change the squares you just duplicated into a satin stitch border 4 mm (.16 inches)
- Insert letters or objects of your choice- in this stitch out we used the new cross-stitch feature in Hatch embroidery software

Interested in learning more about the Hatch 3 software upgrade and add-ons? Learn more about Hatch 3 software and what exciting exclusive reseller bonuses we include when you purchase through us.
How to make your baby block pin cushion:
- Hoop tear-away stabilizer
- Lay a piece of fabric of your choice on the hoop use some spray tack to hold
- Stitch the block outlines
- Carefully trim fabric away from the stitching line
- Continue to stitch your design
- When finished, carefully tear the stabilizer away
- Stitch by hand
- Stuff your block and close
Beautiful Button Jar Pin Cushion
Want an ingenious and easy gift for that special sewer? Here is a simple pin cushion you can make with scrap fabric, batting, a glue gun, and a jar full of buttons.

- Insert one of our wreath designs and resize it to 2.75 inches for a wide-mouth jar
- Insert lettering of your choice
- That’s it!

We have over 1,000+ embroidery fonts to choose from, including BX fonts, ESA fonts, and Stitch File fonts, to personalize your pin cushion project.
How to make your button jar pin cushion:
- Hoop a piece of lightweight stabilizer (cut away) and fabric of your choice
- Stitch out your design
- Trim to within 2 inches of your wreath edge
- Lightly glue a ball of batting to the top of the jar lid (remember to use 2-piece lids, not solid)
- Stretch the fabric over the batting ball and glue it to the underside of the jar lid
- Trim excess
- Fill your jar with buttons (or other craft scraps)
- Apply the lid and ring!
Conclusion: Use Up Your Fabric Scraps To Create A Beautiful Embroidered Pin Cushion
These are two simple, special gifts for sewers and embroiderers that you can quickly make- be the hero of any gift exchange or party! Sometimes the most simple designs and projects are the best because they are a perfect and useful gift made by you from the heart.
Using your embroidery digitizing software, you can also use these projects as learning tools to increase your embroidery digitizing skills and develop your understanding of the embroidery process. You can have fun and learn new skills (these projects are also great for kids)!
So here’s our takeaway on these pin cushion projects:
- Use up small scraps of extra fabric
- Quick and easy project
- Learn to digitize a simple object and insert a wonderful design
Until next time we hope you enjoy these fast and easy projects- keep on stitchin’ and know how much we value your time with us.
P.S. If you want to give your embroidered pin cushion a different look, browse through our giant collection of machine-friendly embroidery designs. Plus, check out our Embroidery Legacy Design Club to learn how to save on our entire database of close to 30,000 quality designs or 1,000 embroidery fonts. Or, if you’ve never tried our designs before, download our free Embroidery Legacy Design Kit.

Leave A Comment