As the name suggests, water soluble topping should be removed by using water. But is it really that easy?

It certainly is! But the tricky part is how to remove it from those hard to reach spaces or small holes in your lettering or designs. Continue reading to find out our cheap, easy secret to remove water soluble topping from those hard to get places.
What Is Water Soluble Embroidery Stabilizer Topping or Solvy?
If you have some embroidery experience, you know how important it is to include a stabilizer when stitching your embroidery designs. Different stabilizers have different uses. Check out our Complete Guide to Machine Embroidery Stabilizers by clicking here. You’ve most likely heard of water soluble topping, also known by its trade name “solvy.” If you don’t know what water soluble toppings is, you’re going to want to add it to your embroidery stash!
Water soluble topping is a must in quality embroidery!

Water soluble embroidery stabilizer topping (or WST for short) is put on anything with a high nap (thicker fabrics), including terry cloth, golf shirts, fleece, and other textured materials. Want to learn more about fabric categories and how and when to use them? Click here to learn about The 3 Main Fabrics Used In Machine Embroidery. These fabric textures have different hills and valleys, affecting the way embroidery stitches into them. Without using WST, it can be hard for your embroidery thread to penetrate the fabric properly and can result in a poorly embroidered object. When you use WST on your project, it allows the stitches to stay on the top of the fabric fibers. This brings density to those grooves, giving your embroidery a full look while also keeping clean lines in your satin stitches.
Water soluble embroidery stabilizer topping creates clear embroidery by creating a smooth embroidery surface. Water soluble toppings do not sink into fabric, giving your embroidery definition and better detail.

Water soluble topping can also be used for projects like freestanding lace where you only want embroidery to be shown. However, with FSL you do not need to hoop any fabric or other stabilizers to assist with your embroidery. To check out our vintage lace embroidery designs, click here.

Please note: Once you’ve opened your water soluble topping, we recommend keeping it in a ziplock bag or airtight container to keep heat and dampness away. As the name suggests, water soluble topping can dissolve once in contact with water, and with a small trace, it can cause the WST to shrivel up and become brittle. Just a friendly remember to store it accordingly.
How Do You Use Water Soluble Topping For Embroidery?
Water soluble toppings are used as a topping.
After hooping your stabilizer and fabric, the WST is floated above your hooped garments and before you embroider any embroidery designs.
To begin using your WST, you must properly hoop your stabilizer and material. Need help with your hooping? Check out our Hooping Tips and Tricks by clicking here. After you’ve completed hooping, float a piece of water soluble topping on top of the hooped garment. You can choose to leave it freely resting on top or pin or tape it in place. But remember, the WST is light and can get bunched under the needle when the machine is running. Once your WST is in place, sew out your desired design. After you’ve finished stitching onto your garment, you must remove the water soluble topping. When removing it, it tears very easily, and all the spaces inside of little areas of lettering or objects tend to get trapped inside of them.

How To Remove Water Soluble Embroidery Stabilizer
You’ve tried everything… tweezers, sponges, using your fingers, even rinsing your object under a running tap after you’ve finished stitching. You’ve probably thought there must be an easier way.
There is! I’m here to show you a secret my family and I have used for many years.
More of a visual learner? I’ve got you covered. Watch the Youtube tutorial here.
What you’ll need:
Twenty-seven years ago, during the factory days of my families’ business, we used water soluble topping quite frequently. As we would run thousands of golf shirts daily, using water soluble toppings was a must. Water soluble toppings tears away extremely easily, but because it’s sticky, it tends to get stuck in the inside of letters/holes in embroidery (especially in O’s, A’s, P’s, etc). Production time equaled money, so we needed the quickest and easiest way to remove water soluble toppings.
This is what my family came up with; you’ll need:
- A bowl of water
- Water soluble topping (leftover scraps work great)
- A tennis ball
… Yes, you did read that right, you will need a tennis ball.
Removing water soluble embroidery stabilizer
You may be asking yourself, “why on earth would I need a tennis ball to remove water soluble toppings?”, the answer is quite simple.
The best way to get rid of solvy is solvy!
Next time you use any water soluble topping, make sure you keep the excess topping after you’ve torn it off your embroidery.
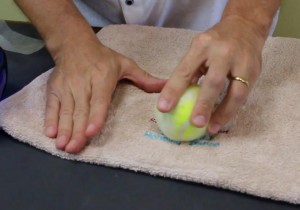
Wet your cheap tennis ball in your bowl of water. You want it to be damp, not soaking, so you may have to squeeze out some of the water. Begin to wrap your damp tennis ball with your leftover solvy pieces. Eventually, you will have a solvy covered ball. Once it dries, it will have a nice hard surface, acting as a cocoon around the ball.

To get rid of the water soluble topping stuck in your embroidered design, simply wet your fingers with water and begin rubbing an area of your solvy-ball until it becomes wet and tacky. Then tap it on the water soluble topping you wish to remove, and it should come right off!
It’s as easy as that! The best way to remove solvy is solvy! Working like a magnet, it attracts to itself and lifts the topping off instantly!

Conclusion: Use A Tennis Ball To Remove Water Soluble Topping
Hopefully this tutorial has helped you better understand a bit more about water soluble toppings and when to use it. We’ve demonstrated how to use it in the most effective (and did we mention budget-friendly) way to remove any small and hard to reach pieces left behind. Next time you’re out, be sure to grab a cheap tennis ball as you never know when you’ll need it for your next embroidery project.
Remember to have fun learning this new embroidery technique. Try it on a design now!
P.S. Browse through our giant collection of machine-friendly embroidery designs for more project inspiration! Plus, check out our Embroidery Legacy Design Club to learn how to save on our entire database of over 30,000 quality designs. Or, if you’ve never tried our designs before, download our Free Embroidery Legacy Design Kit for 11 fan-favorite designs!


Thank you for the instructions on removing stabilizer.
My pleasure Bonnie, thanks for reading / watching!
Very cool tip.
Thanks Jill 🙂
Enjoyed your tip. Will pass it along
Thanks Dianna, glad you enjoyed it!
Can’t wait to try this! Have been using tweezers but it can take forever – or it seems like it. Thank you.
This will help speed you up. My pleasure Debra, happy stitching!
Thanks, John. I will definitely be giving this a try.
All the best for the New Year to you and your family.
Thank you Bronwyn, all the best you and yours as well!
Can’t wait to try this one!!!
Thanks for reading 🙂
thanks for sharing!!
Thanks for taking a read Dawn!
I find s good bristled clothes brushes work wonders
Great suggestion Deborah!
What a great idea! I will have to try this!
Who knew a tennis ball could be used in embroidery? Let us know what you think 🙂
Thank you I will be trying it for sure
Let us know how you like it Marlene!
January 2021. Wow, thank you so much for this tip. I have been embroidering for many years, and tried (not always successfully) to get the pieces out of small letters with a pin. I can’t wait to try your method. THANK YOU and a happy new year
Happy New Year to you also Janet! Oh wow, a pin! This tip will make it a lot easier for you, thanks for reading 🙂
Nice tip! I guess now I’ll buy a tennis ball!
Thanks for reading Brenda!
Awesome tip!
Thanks for reading June 🙂
I use a lot of WST and I am so glad to find out about the tennis ball. Thanks so much.
Glad we could help Margaret, let us know how you find this works for you 🙂
Hi
If I need to make a sequins and beads on a tulle material, what is the best stabilizer should I use?
Hi Ahmed, unfortunately that is not my specific area of expertise, I suggest posting the question in our FB Group to see what others opinions are. https://www.facebook.com/groups/EmbroideryLegacy
John,
I loved this tip and will give it a try.
Aside from the usual spray, which some times causes the nap to get stiff or picking with tweezers and running the risk of picking the garment itself. I use the stitch eraser, that is the rubber end on the stitch ripper cap. This pulls the Solvy out of those small areas and leaves no residue.
Thanks for sharing Linda 🙂 yes, please let me know what you think!
Will it work with mesh wash away stabilizer?
I very much doubt it as it is a much thicker product which requires a lot of water to dissolve.